Parsley + Vanilla? Let’s Roll With It: Vanilla Parsley Swiss Roll

May 10, 2021
Guten Tag!
Apparently, that’s the German way to say hello! I thought this was fitting because this week we’re making swiss rolls. Swiss rolls are not Swiss, but likely originated in a middle European country, like Austria. Not Switzerland. I was running low on ideas for the kinds of food to make this week, so I recruited my sister to help me decide. She would say a kind of food, and I would name a spice, and in the count of three… we came up with parsley + swiss roll? We decided it was worth a shot and so we rolled with it. Haha.
Parsley
Parsley, or petroselinum crispum, is a common garden herb and spice. It is a common garnish on meat, cooked vegetables, and soups. As it turns out, it also pairs nicely with vanilla!
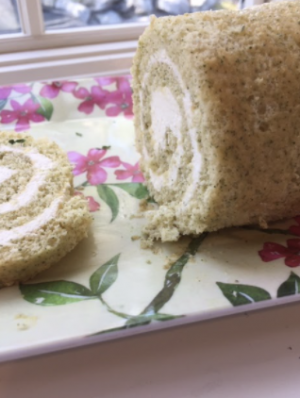
Parsley-Vanilla (Vanilla-Parsley?) Swiss Roll
This week’s creation is not as “out there” as it seems. As it turns out, there are many many food creations that use this flavor combination! Straight up parsley cake with vanilla ice cream, parsley-vanilla cheesecake, parsley vanilla milkshakes, the list goes on. After making this swiss roll, I can see why! The flavor is really interesting because you’re first hit with vanilla, but the flavor morphs int
o a more herby, grassy taste. Not in a gross way, though. To be honest, the green color is kind of adorable too! What’s not to love? The base roll recipe we got from womanscribbles.net.
As usual, see the recipe below!
Auf Wiedersehen!
Spice Girl
Recipe
Makes: 1 roll, approximately 12 servings
Prep Time: 1.5 hours
Cook Time: 12-14 minutes
Difficulty: Advanced
Ingredients
Cake:
-4 eggs
-½ cup sugar, divided in 2
-3 tablespoons oil
-¼ cup milk
-1 teaspoon vanilla extract
-1/2 cup + 3 tablespoons flour
-1 tablespoon parsley
-½ tablespoon baking powder
-¼ teaspoon cream of tartar
Whipped Cream:
-1 cup heavy whipping cream
Additional tools:
-Pre-frozen bowl and whisk (put in your freezer for 1 hour!)
-
- Grease your sheet pan, with whatever grease you prefer. We used oil and a reusable baking mat. Preheat the oven to 350 degrees Fahrenheit, so it’ll be ready right when you finish the meringue!

- First, you’ll want to separate your eggs, so the meringue is fluffy! Set up three bowls in a row. Crack your eggs over the middle bowl and leave only the whites in the right and yolks in the left. Or maybe the other way around. Use your hands! This is so that if you burst the yolk, you don’t have to start all over. You just have to crack another egg! Don’t be like me, who just uses two bowls and uses the eggshells. Or maybe you can be like me, but I don’t suggest it as a beginner! Ah, not following my own advice…
- Set aside the whites. Whisk the yolks and ¼ cup of sugar together. This is so that the cake will be super fluffy. You want the mixture to become lighter as you whisk. That way, you’ll know that it’s been aerated. See reference picture to the right.
- Then, gradually add in the milk (only half of it, so ¼ cup), oil, and vanilla. When this is incorporated, sift in your flour and baking powder.
- This next part is critical for a good rise! Put your egg whites and whip using a hand mixer on high speed until you see foam. Then, add cream of tartar until soft peaks form. Finally, add the remaining half of the sugar gradually, as you continue to whip. Whip the mixture until it forms stiff peaks. Tip: “Stiff peaks” refers to the mixture having a strong structure. If you pull your mixer out of the beaten egg whites, and the mixture has a pointy peak, it’s ready!
 Another more risky way, which is often seen on baking shows, is to flip the mix over your head to see if it falls. Your pick! Tip: Soft peaks are different from stiff peaks! When you pick up your whisk the eggs should stand for a few seconds before drooping, but won’t fall off the whisk.
 - Gently fold the egg whites into the egg yolk batter. Plop the egg whites in by thirds, and use a rubber spatula to make folding motions. Work quickly but gently, because we don’t want the air bubbles to p
op or deflate. - Grab your sheet pan and pour the batter into the center. Using a rubber spatula, spread it out evenly to all corners of the pan. Put your pan in the oven and cook for 12-14 minutes or until golden brown.
- While the cake cooks, make the whipped cream! Take out your pre-frozen bowl and whisk attachments.
- Pour the heavy whipping cream into the bowl and whisk using the hand mixer on high speed. Tip: keep your mixer’s whisks in contact with the bottom of the bowl at all times. This will prevent the contents of said bowl from flying everywhere! Your whipped cream is ready once there is a shape and form to the cream. Look for soft peaks.

- Pull out your cake. Sprinkle a towel with powdered sugar. Carefully flip the cake out of the sheet pan, onto the towel. Roll the cake up carefully with the towel between the cake, as if you were going to make the swiss roll with the towel, but loose. Wait for one hour before unrolling. If you like, you can cut off the ugly edges to create clean edges and a nice snack!
- Spread the whipped cream over the top, all the way to the edges. Then the rolling begins! I forgot to get pictures for this, but make sure your log is on the towel, this will help you roll with more flexibility.
- Maybe recruit a family member for this part! Roll just the edges in with your fingers. Then, using a towel, pull the edge of the towel up over the rolled edge of the cake to continue the roll. Periodically use your fingers to push toward yourself, so the roll is tight. Make sure you’re rolling so that the final length of the cake is the short side, not the long side.
- Wrap really tight with plastic wrap. Leave the cake in the refrigerator for an hour so that the shape holds.
- Enjoy!
- Grease your sheet pan, with whatever grease you prefer. We used oil and a reusable baking mat. Preheat the oven to 350 degrees Fahrenheit, so it’ll be ready right when you finish the meringue!